Use Test Mode
Test Mode (aka Developer Sandbox) allows you to explore and test different ways to use and integrate DocuSeal without needing to operate in the production environment. You can use Test Mode for debugging and testing your integration solution. Additionally, you can make your production templates available for testing in the test environment. All actions performed in Test Mode have no impact on your production environment, as the two are completely isolated.
Test Mode API and Embedding is free and available both in the Cloud and On-premises.
Advanced API and embedding features are not available in the open-source free self-hosted Test Mode, but only in Pro On-premises.
- How to enable Test Mode
- How to share a production template with the Test Environment
- How to use the API in the Test Environment
- How to use embedding in the Test Environment
Notes
- The test environment operates as a completely separate, isolated DocuSeal account.
- API keys created in the test environment cannot be used in the production environment, and vice versa.
- Test Mode is intended for debugging and testing your integration, not for production use.
- Templates created in the production environment can be shared with the test environment for testing and adjustments without needing to recreate them.
How to enable Test Mode
- Log in to your DocuSeal account.
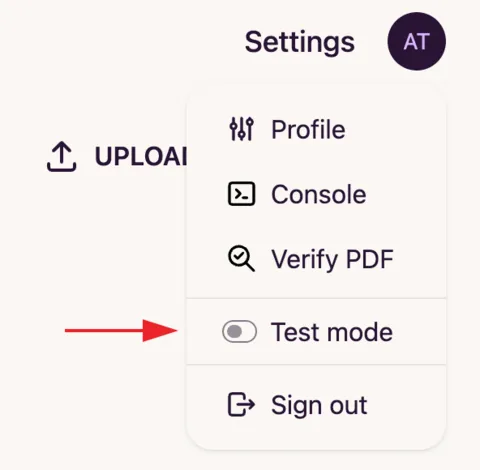
- Click on your initials in the top-right corner of the screen and select Test Mode from the dropdown menu.
- You will be instantly redirected to the test environment, which is completely isolated from your production environment.
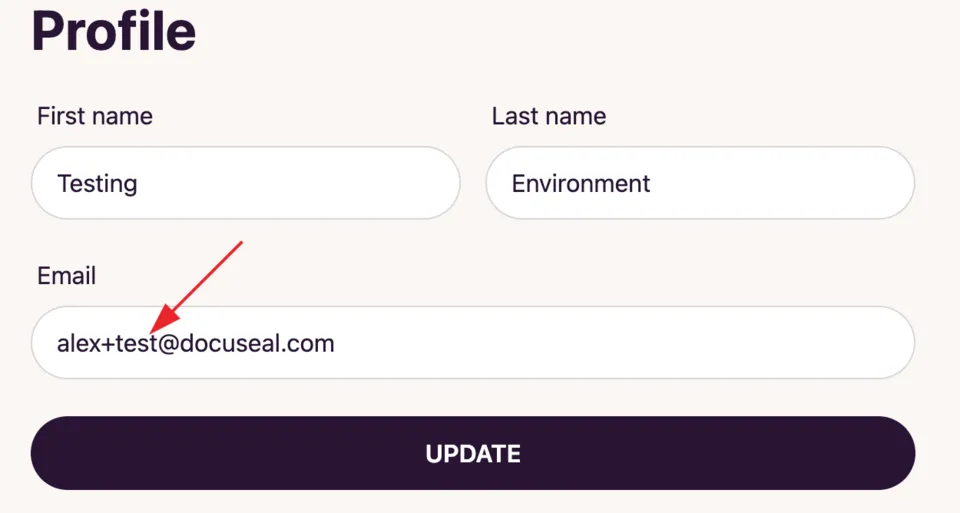
- In the same menu, you can select Profile to view your details in the test environment.
These details will differ slightly from the production environment. For instance:
- Your email will have the suffix +test.
- Your company name will start with Testing.
These differences make it easy to distinguish between the test and production environments.
How to disable Test Mode
- When Test Mode is enabled, you will see a Test Mode badge in the top-right corner of the screen. Click on this badge to instantly return to the production environment.
- Alternatively, you can go to the Profile menu and toggle off Test Mode in the left-hand menu.
How to share a production template with the Test Environment
Although the environments are completely isolated, you can make a production template available in the test environment for debugging purposes.
Note: Changes made to a template in the test environment will reflect in the production version of the template. This allows you to debug templates in the test environment without recreating them in production.
- In the production environment, open the template you want to share with the test environment.
- Click the button in the top-right corner of the screen.
- In the modal window, navigate to the API and Embedding tab.
- At the bottom of the modal, toggle on Share template with Test Mode.
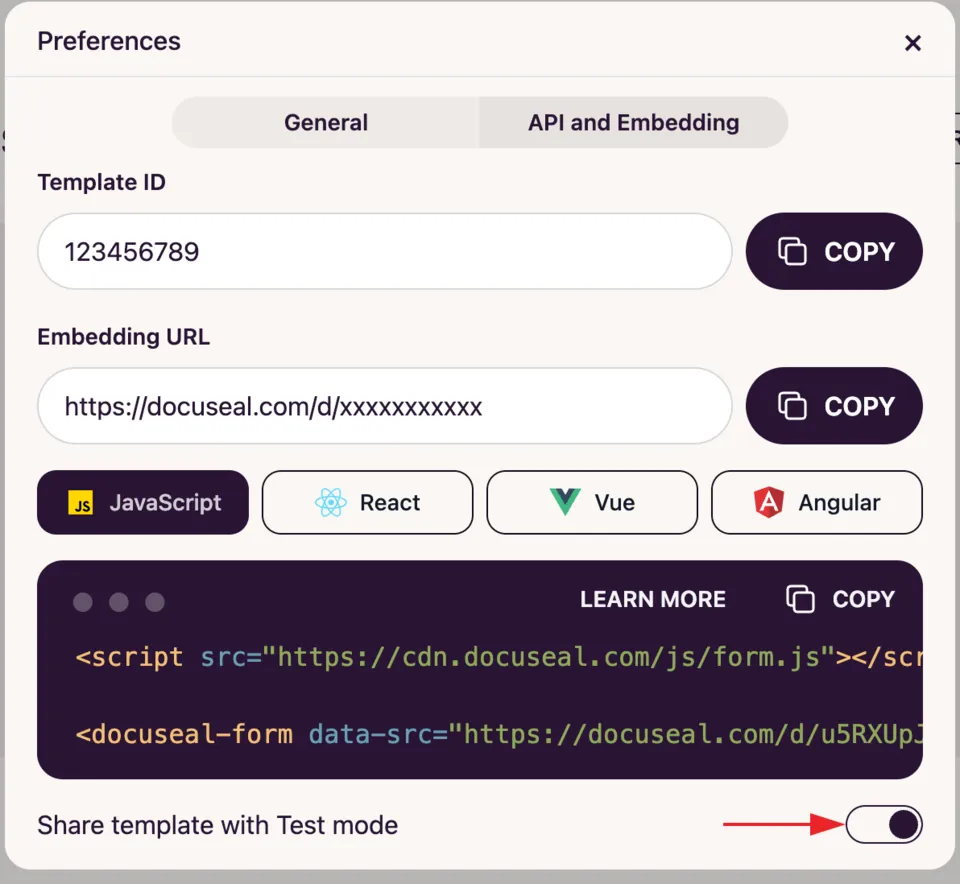
- Done! Your template is now available for testing and debugging in the test environment.
How to use the API in the Test Environment
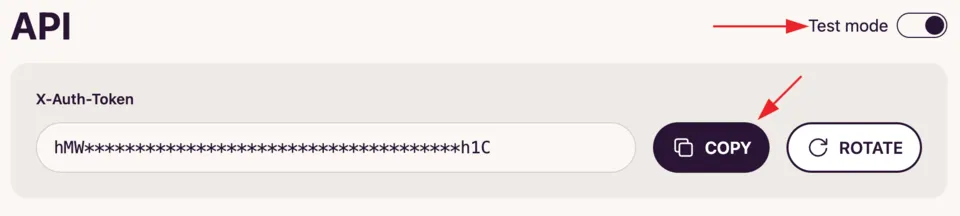
- Obtain an API key for the test environment:
- Click on your initials in the top-right corner of the screen and select Console.
- In the left-hand menu, select API.
- Toggle on Test Mode in the top-right corner.
- Copy your API key by clicking the Copy button.
- Use this API key to integrate with the test environment. DocuSeal provides SDKs for various programming languages:
Note: This API key is for use in the test environment only. It cannot access production data and must be replaced with a production API key once your integration is ready.
How to use embedding in the Test Environment
Let’s explore how to integrate the Form Builder into your website using a test API key.
- Generate a JWT token on your website’s backend.
- Depending on your backend language, use the appropriate library to generate the token:
- JavaScript - jsonwebtoken
- Ruby - jwt
- Python - PyJWT
- PHP - firebase/php-jwt
- Java - jjwt
- C# - System.IdentityModel.Tokens.Jwt
- Go - golang-jwt/jwt
- Rust - jsonwebtoken
- Include the following attributes when generating the JWT token:
- user_email - The admin user’s email (required). For the test environment, it will have the +test suffix and can be found in your profile.
- integration_email - The email of the user for whom the template is being created (optional).
- document_urls - An array of URLs for the documents you want to display in the builder (optional).
- Pass the JWT token to the builder on your frontend. Implement this according to your frontend requirements.
- Done! You can now use the builder on your website for testing and debugging your integration.
Notes
- Do not use your production admin email for user_email in the test environment.
- Once everything is working correctly, replace the user_email with your production admin email and the test API key with a production API key.
- Document URLs must be publicly accessible without authentication or restrictions.
- You can customize the builder further using additional attributes. A full list of attributes is available here.